Fiberglass is what is used as the base of the boat. These are the strands underneath the gelcoat that you typically do not see. (unless there is a gouge!) Over the fiberglass usually gelcoat is applied at the factory. If the surface is scratched gelcoat is the same color throughout; if the surface has been painted when scratched it will show what is underneath.
Need a repair?
If it is just a gouge and not penetrated all the way through the boat, then you would need to fill in the gouge with 3M premium marine filler (just one product that will work but our most popular for this use). After you have filled in the gouge and sanded it down, you would then apply the topcoat of gelcoat. (gelcoat is the top finish that you see on your entire boat.) Gelcoat is typically much thicker than a paint and is designed to protect the underlying fiberglass as well as provide a smooth shiny appearance. Be sure to leave the marine filler about 1/8″ lower than the surrounding gelcoat. This will allow you to apply enough gelcoat and be able to feather the surrounding area once your done. If you leave the marine filler flush, then once you apply the gelcoat you will have a lump on the area you are repairing (gelcoat should be thick enough or it could release from repair).
The amount that you will need is dependent on the size and number of gouges. If you have many gouges, you may consider buying a quart of gelcoat. However, the nice thing about the gelcoat repair kits is that they come with tints so that you can try to match your existing gelcoat color.
If you need to tint a quart our gallon to match see our available gelcoat tints, please note it isn’t recommended to use more than 1 oz of tint per quart or the curing of gelcoat could be effected.
What is gelcoat?
Gelcoat is a type of polymer that is used as a protective coating on boats and other watercraft. It is typically applied to the hull of the vessel, and it acts as a barrier against UV rays, salt water, and other elements. Gelcoat is available in a variety of colors and can be polished to a high shine. It is also one of the most durable materials used in boat construction, making it an ideal choice for those who want their vessel to look good for years to come.
Gelcoat is a liquid resin that is used to create a smooth, shiny surface on boats and other products.
What is difference between gel coat and paint?
Gelcoat is usually much thicker than paint and is engineered to protect the underlying fiberglass as well as provide a smooth shiny appearance. However, the nice thing about the gelcoat repair kits is that they come with tints so that you can try to match your existing gelcoat color. Paint is thinner and typically much easier to apply. Unlike paint, gelcoat will not adhere to existing paint, wood, metal or concrete. Gelcoat also has a limited shelf life of around 3-4 months at around 70 degrees whereas paints that are solvent-based can last up to 15 years while latex and water-based ones may last for up to 10 years.
Final thoughts
So, how do you know if your boat has gelcoat or paint? One method is to use rubbing alcohol on a white cloth and rub it over an inconspicuous area of the hull. If the surface starts to shine, then it’s likely that you have gelcoat. Another option is to take a piece of sandpaper and gently rub it over an area where the finish appears smooth. If the paper doesn’t snag and pull up any fibers from the surface, then it’s most likely gelcoat as well. With this information in hand, now you can properly care for your boat and keep its beautiful finish looking good for years to come! If you need assistance selecting the right gelcoat for your needs, contact technical support at Bottom Paint Store.
This is one of the questions Bottom Paint Store is asked the most. Let’s start with explaining that gelcoat is not a paint but a type of resin that is used to provide a protective layer over fiberglass.
Key takeaways on how to apply gelcoat:
Clean the repair area and all tools with acetone prior to application.
Do not work in direct sunlight. Choose a shady location or an overcast day.
Catalyze your material so that it has a longer pot life.
Apply the gelcoat using a brush or spray gun.
Apply gelcoat in 4-5 layers at approximately 5 mils each, allowing 15-20 minutes between layers for a total thickness of 20-25 mils.
Use a gelcoat thickness gauge to ensure proper thickness is achieved.
Once gel coat has tacked up, about 20 minutes after final layer has been applied, lay-up of the part can begin.
Here are the steps to apply gelcoat using a brush.
Below you will find a detailed gel coat preparation guide on how to apply gelcoat to your boat, RV, or other surfaces. The secret to a good finish is to apply the gelcoat properly. The application of gelcoat is pretty straightforward when you follow this guide.
Determine the Existing Surface: First thing you want to do is look at the surface on which you want gelcoat applied. If the surface is already coated with gelcoat, or if the surface is a fiberglass or polyester resin, then the application of gelcoat is a snap. If the surface is painted then the paint should be removed before the gelcoat is applied.
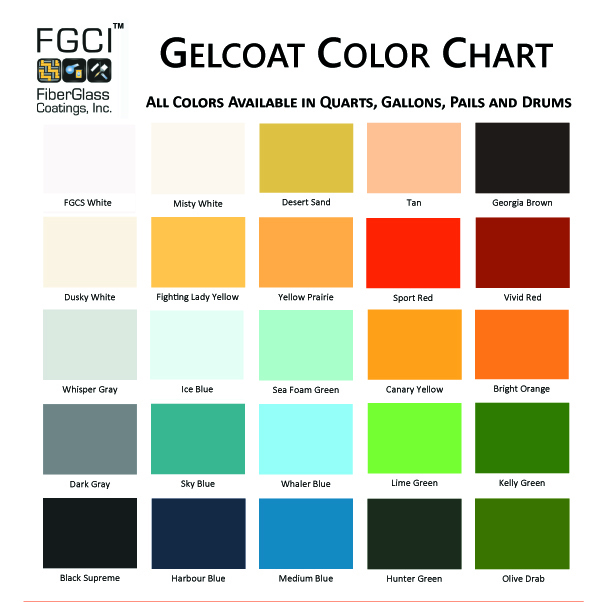
We offer pre-mixed colors of gelcoat, use this color chart as a guide for the available colors that we have.
Prepping the Surface: Remove rails, cleats, louvers, snaps, striping tape, etc. Duct tape off adjacent gunwale molding, and deck fittings you are unable to remove. **NOTE** Duct tape is recommended over masking tape because it provides better protection. Remove seals from the edges of parts or fittings when doing a repair around that part or fitting. Take steps to cover and protect the rest of the boat before starting. When working on the deck or cabin, tarp off the adjacent areas. 3M and UV tapes , and masking papers are recommended.
Sanding Existing Gel Coat: You want to sand the surface to make a mechanical bond to the gel coat. Our technicians suggest the use of Dyekum Steel Blue Dye to be really thorough. Steel Blue is a dye you’re going to wipe on or you can use the blue dye spray. If you don’t see the blue dye again, you know you’ve sanded it all properly. Start by sanding the surface with 150 grit or sandpaper. The heavier fast-cut grits (40/80/100) are used to feather sand and ground out a routed area prior to filling. Also, they are used for the first sanding of gouges, dock dings, scratches, and blisters. When sanding areas that have been filled with putty we suggest using 40 or 80 grit sandpaper, depending on how large the repair is. Once the fill area is level or contoured to the desired shape, sand with 100 grit paper to remove the course scratches from 40 or 80 grit. You should also feather the surrounding area of the gel coat repair with 220/330. At this point, the repair is ready to prep and spray/brush with gelcoat. Use 3M Abrasives for best results.
Preparing the Surface for Application: Next, you’re going to have to clean the surface. We encourage the use of Acetone, because it does not leave residue and evaporates easily. When the surface is clean, you want to get moving fairly quickly; if the surface is sitting for some amount of time, you want to re-clean the surface. Dust and dirt particles are your enemy here, so make sure you clean the surface thoroughly. Determine whether you need one or two gelcoat coats. If you change colors, it will require at least two gelcoat coats. If this is going over a patch, at least 2 coats are recommended to get a uniform surface. Otherwise, there will be only one coat.
Method of Application: Next, determine if you are going to brush, roll or spray your gelcoat so you can prepare the gelcoat for application. If you have Professional Grade Exterior Gelcoat you may either brush/roll or spray. When rolling on gelcoat be sure to use a 1/8 “or 1⁄4” solvent-resistant nap. Be sure not to use foam rollers because they tend to leave the bubbles. If you brush on the gel coat, make sure to use a solvent resistant brush.
Gel Coat Additives: You should also determine which additives you will use with your gelcoat application.
Wax Additive: Add up to 4 oz of Wax Additive per gallon 1 oz per quart for tack-free surface on the final coat, or if applying one coat a recommended film thickness. The Exterior Gelcoats that recommend a wax additive is included with purchase at Bottom Paint Store. (A wax additive is NOT used with Brushable Gel Coat or HI UV Clear.) You should only use a wax additive in the final application coat or if you are planning on only one coat.
Partall Film #10 PVA Surfacing Agent For Gel Coat: Use this product as a surfacing agent when using Gel Coat without wax additive and typically larger spray applications. Partall Film #10 is a polyvinyl alcohol (PVA) water/alcohol solution of water-soluble, film-forming materials. This parting film is particularly recommended as a parting agent for separation between polyester or epoxy resins and various mold surfaces. It is not recommended for use with resins containing water or giving off water during cure (i.e., phenolics) or with automotive finishes, as damage may occur. Partall Film #10 will not shrink and pull away from corners or curved surfaces. After the resin has dried, the film parts easily from the mold and is readily dissolved from the molded parts with water. An occasional coating of Partall Paste #2 is required on most mold surfaces before application of Partall Film #10. May be applied over gelcoat as a surface cure agent. (recommended for HI UV Clear since no wax should be added)
Patch Booster Gelcoat Additive is an additive that significantly improves the application, appearance, and longevity of gelcoat patches. Patch Booster eliminates the need to thin, side-promote, or add wax to gelcoat prior to patching. Formulation enhancements have lengthened the shelf life of a sealed can to (1) year while maintaining a sand-able cure in 1-3 hours. Do not use any other wax additive when using Patch Booster. Patch Booster should be used with Professional Grade Exterior Gel Coat. Another popular additive option is the Duratec Hi-Gloss Additive Clear, see the tech data sheet for mixing details for all items.
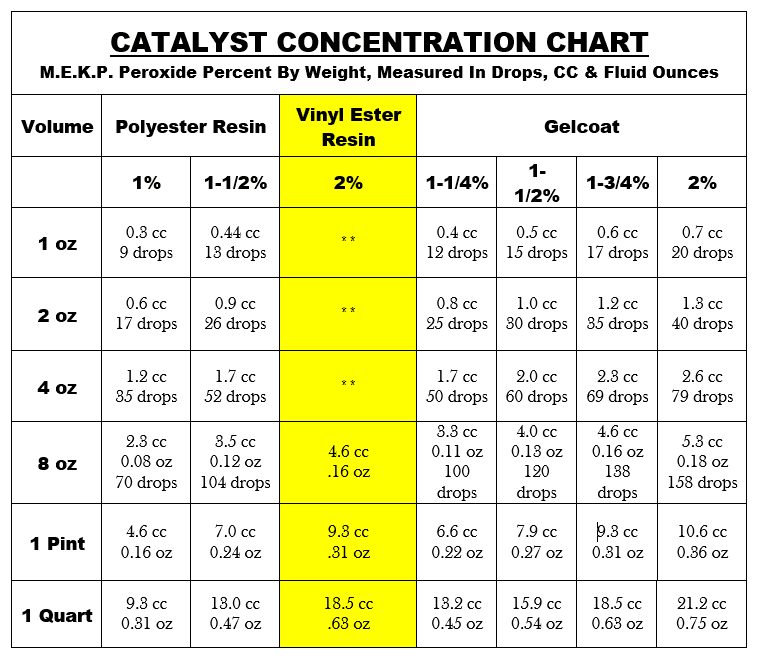
Catalyzing Gelcoat with MEKP: All gelcoat MUST be catalyzed with MEKP to cure. This should be added after all other additives just prior to application. Gelcoat requires Methyl Ethyl Ketone Peroxide or MEKP to enable the process of hardening. It’s a very small number. We suggest 1-1/4% to 1-1/2% by volume, i.e. 13-15 cc per quart. Darker colors need a little more catalyst for the same reaction, so you can catalyze up to 2%. All Gel Coats from Bottom Paint Store come with MEKP with each gelcoat purchase. Refer to the catalyst chart located on the product page for the gelcoat you are using or follow the label guidelines. As a general rule: The catalyst level (MEKP) should not exceed 3.0% or fall below 1.2 for proper cure. Ideal range is 1.8% @ 77°F. Gel time at 1.8% MEKP is 10-17 minutes. This time element is dependent on material temperature, room temperature, humidity, air movement, and catalyst concentration.
Gelcoat should not be used when temperature conditions are below 60°F, as curing may be adversely affected. Be sure to have a good strategy when applying your gelcoat. Once you mix and catalyze, you have about 15 minutes to apply the gelcoat before it starts getting hard or starts to “gel.” The actual working time depends on the amount of catalyst and how hot the working conditions are. Anything below 60 degrees, and your gelcoat will not cure, but as you get warmer and warmer, your working time will decrease rapidly. At 70 degrees, you get 15 minutes, but at 90 degrees, you only get 5 minutes. If you need more time to work, be sure to sit the can in some cold ice water to cool it down to 60 degrees to allow you a little more working time.
One gallon of polyester resin weighs approximately 9.2 lbs. One gallon of gelcoat weighs approximately 10.5 lbs. The weight of MEKP 925 is 1.125 grams per cc. 30 drops is approximately equal to one cc.
cc = cubic centimeter. Oz = fluid ounce Note: Using drops for catalyst measurement is only an estimate. In critical applications MEKP should be measured using cc’s or fluid oz’s which are volume measurements. The percentages in the chart: 1% thru 2%, are percentages of resin or gelcoat by weight. The cc and oz values in the chart have been converted from weights of MEKP to volumes of MEKP.
1 ML = 1 CC
If using a wood mixing stick, place the stick in resin before adding catalyst so the wood doesn’t absorb catalyst
Only catalyze slightly more than needed. Resin that cures still in the mixing pot is unusable. Mix small batches at a time since too much MEKP will result in the hardening of the gelcoat way too fast! Refer to the catalyst chart located on the product page for the gelcoat you are using or follow the label guidelines.
Gel Coat requires the addition of fiberglass resin hardener or catalyst (MEKP) at 1.8% by volume (77ºF) (approximately 12 drops per ounce)
Measure catalyst accurately. Under or over catalyzation retards curing and causes fading and chalking
All Gelcoats from the Bottom Paint Store comes with the MEKP catalyst but additional amounts can be purchased.
Applying Gelcoat by Brush or Roller: Choose a good pure (natural) resin-resistant bristle brush with tapered ends. Avoid brushes that are either too stiff or too soft. For most work, a 3″ or 4″ wide brush will suffice. If there is a trim color, you should have a narrow trim brush on hand. Our Gelcoat comes with MEKP hardener with every purchase, but you may need more which you can purchase as an option depending on the application, temperature, and other environmental factors. Please refer the to Catalyzation chart on the Gelcoat page or on the label. Gelcoat needs to be applied evenly. We suggest a thickness of 18-20 mils to properly cure. The thickness of the matchbook cover is approximately 18 mil. If you’re not sure how thick it is, pick up a mil gauge. This is a simple, easy way to see the thickness of your gelcoat. See this article for more information: How to Apply Gelcoat by Brush and Roller.
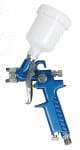
Spraying Gelcoat: For best results spraying gelcoat, it is recommended to use a spray gun designed specifically for applying gelcoat and resins, such as the professional grade spray guns offered by FGCI and ES Manufacturing. Next decide if you want to use an aluminum, plastic or paper cup to house the gelcoat. You can use either a heavy-duty, reusable plastic cup or disposable paper cup for spraying gelcoat. There are also disposable cup liners available that you can insert into the plastic Poly-Pro graduated cup or paper cup. You can mix your material right in the lined cup and then simply insert the cast aluminum lid onto the lined cup, attach the cup to the gun and you are ready to spray.
Can I spray gelcoat with an airless sprayer? Yes, you can spray gelcoat with an airless sprayer however it is it is recommended to use a pressure of 3000 psi. The pressure at which you spray gelcoat depends on the type of gun you are using. For example, if you are using a conventional spray gun, you should set the pressure between 30 and 50 psi.
Please follow the instructions located on the products page or the label. Spraying Gelcoat delivery rate of no more than 2.5 pounds per minute with conventional air atomized spray, and no more than 4 pounds per minute with airless equipment. Spray: Airless or Conventional: 2.0-2.5 orifice tip. Use a gelcoat spray gun such as ES Manufacturing Gelcoat Spray Gun G830, ES-G100 Spray Gun, or equivalent.
You will need to thin the gelcoat for it to run through the spray gun. There are 2 thinners that are recommended by the manufacturer when spraying gelcoat: Patch Booster, and Duratec. Patch booster is used with a 5:1 ratio or about 20% by volume. Do not use any other wax additive when using Patch Booster. Duratec is for a cosmetic high gloss finish. It has to be mixed at a 1:1 ratio with gelcoat. Since manufacturer specs change often due to formula updates be sure to follow the most recent recommendations from the technical data sheets. Some customers use Styrene for thinning but the manufacturer warns it can affect the gelcoat colors although this is the most cost-effective option and doesn’t have the added wax.
Initially spray a cover coat as smooth and evenly as you can to cover your repair. This coat should be mostly in the repair area and may be repeated. Sanding between coats is not necessary unless a surfacing agent has been added to your gel coat. Once your repair is covered, feather a ‘flow’ or sanding coat on the masked-off area making layered passes to avoid a buildup of gel coat in any one area. Each of these coats of gelcoat may involve several passes. Be even and consistent in your gun movement, overlapping each previous pass slightly and not hesitating on the ends. When spraying to a radius, flow the gelcoat to the tape. In open flat areas, layer passes. The final thickness should be 16-20 mils minimum or the gelcoat may not fully cure. Gelcoat needs to be applied evenly. We suggest a thickness of 18-20 mils to properly cure. The thickness of the matchbook cover is approximately 18 mils. If you’re not sure how thick it is, pick up a mil gauge. This is a simple, easy way to see the thickness of your gelcoat. As soon as you are done spraying, clean your sprayer fully with acetone. Most re-sprayed gelcoat will cure in 2-4 hours, although overnight cures are ideal.
Finishing your Gelcoat Application: If you’re using our Professional Grade Exterior Gelcoat, you’ll be ready to sand and buff your freshly gelcoated surface once it has cured to a hard surface. You should not be able to dent it with your fingernail. Begin wet sanding with the finest grit that will remove orange peel in the re-sprayed area. This will avoid unnecessary sanding scratches. Usually 320 or 400 grit wet paper is sufficient for the initial sanding. Going up to 400, then 600, and eventually 800 grit sandpaper. Compound and polish with Aquabuff 2000 then happy a wax such as Collinite 925 UV for protection.
Another option is you can use an 800 grit compound for the gelcoat at this stage. You want to use a buffer that turns 1600-3000 RPM. The car polishers won’t work if they’re spinning too slowly, so you want to check the speed of the spin. It’s best to do a 4-foot by 4-foot area at a time. Every 10 feet or so, you’re going to want to clean your pad with a spur or some air to make sure the contaminants don’t scratch your surface. If you want a perfect, glossy shine, use a machine glaze and then two wax coats, and you’ll have a stunning, glossy professional finish.
IMPORTANT GELCOAT APPLICATION TIPS:
DO NOT WORK IN DIRECT SUNLIGHT -Choose a shady location or an overcast day. You should catalyze your material so that it cures as quickly as possible within your working time. Generally, mix one-pint batches. A good practice is to pour the mixed gel coat from the mixing container into another container used for application. This further assures that no uncatalyzed material is clinging to the sides of the pot. “Lay on” the gel coat in a heavy thickness (about 10 mils) using horizontal strokes, and working from top to bottom. Avoid re-brushing as this could remove the waxy surface additive. Remember to always lap wet. Generally, one heavy coat is sufficient. However, if you have opacity problems two coats may be necessary with a light sanding between coats. Once the coating (gelcoat) has cured, it should be block sanded using 250 wet grit paper to remove all brush marks and high spots. Following this, it should be wet sanded with 320, 400, and 600 wet grit paper, buffed, polished and waxed.
Clean repair area and all tools with acetone prior to application
Pot life (amount of time for application of the product) shortens dramatically as you mix larger batch sizes. Keep in mind that you have a limited time to apply what you have mixed (usually between 5-15 minutes).
Measure catalyst accurately. Under- or over-catalyzed gel coat will cure slower and look faded or chalky.
Use the recommended thinners/additives only which are listed on the gelcoat’s product page.
Gel coat will not fully cure without adding a surfacing agent or over spraying with PVA
Check color thoroughly before applying. Gelcoat will not darken or change colors when it dries. The color wet is the color when dry.
Store gel coat in a cool, dry place
Gelcoat should be applied at temperatures of 60ºF to 80ºF
Always use eye and hand protection
Gelcoat should not be applied over paint, wood, metal, or concrete. It usually will not adhere to these surfaces.
Gelcoat will not fully cure without adding a surfacing agent or wax additive sanding aid. You can over-spray with PVA before gel coal reaches its gel stage (5-10 min.), or add 1oz per quart/ 4 oz per gallon of wax additive sanding aid.
Read all warnings on product labels and only use additives recommended as described per each product.
In order to have a form from which to develop your mold, you must either build the article from scratch using wood, plaster, polyester putty, formica, sheet metal, etc. or you must have on hand a completed article which you wish to duplicate. The latter is of course the fastest method. The plug is generally a male model exactly like the item you wish to fabricate in every detail. If the plug does not have draft (taper) then you will have difficulty getting parts off. If the plug has reverse bends, like many canoes, then you will need to make a split mold which can be spread or taken apart.
If the plug contains soft materials on its surface such as plaster, wood, or putty, then it will have to be sealed with lacquer orresinto fill the pores. If plaster is used, it must be oven dried and then sealed.
To prevent your mold from sticking to the plug, the plug must be coated with plastic film known as “PVA.” This is a plastic dissolved in alcohol and has a green color. It can be brushed or sprayed on, but the best system is to spray on three thin coats, the first being a “mist coat.” The appearance will then be green. Each coat must dry half an hour or so and there must be no pools or drips to blemish your mold surface. For the easiest possible parting, before applying the PVA, apply a soft wax (TR Mold Release) formulated for use with PVA.After the third coat ofPVAhas dried, a coating of this wax can be gently applied over it for easy parting.
The Mold
The first step is to apply a gelcoat which will be the mold surface. Thegelcoat must be “exterior gelcoat” (wax free). If many parts are to be taken off the mold, it is desirable to use a“tooling gelcoat” which is designed to give longer life in mold use. The gelcoat should be in contrasting color to the surface of the part you will make. Since most parts are light colored, black gelcoatis commonly used. This facilitates spraying up a uniform thickness of light colored gelcoat since the black will show through thin spots.
If the gelcoat is to be brushed on, two coats must be applied, and the first coat must cure several hours before the second coat is applied. The best means of gelcoat application is a simple gelcoat gundesigned for the purpose and easy to clean. Air pressure of 80 to 90 pounds is desirable. Gelcoat must be applied at least 15 mils thick, or a quart to every 25 square feet of surface. If the plug was rough so that considerable sanding of the gelcoat will be necessary, then double the application. Before applying the gelcoat, it must of course, be catalyzed with MEKp peroxide hardener, using from one to two percent. All gelcoats from the Bottom Paint Store include the MEKp.
When the gelcoat has cured so that it cannot be scratched off with the fingernail at the edge of the mold, which takes from 2 to 4 hours to overnight in cool or humid weather, you are ready for the “skin coat.” This is a layer of ¾ or 1oz. fiberglass mat, thin enough so you can see and remove all air bubbles entrapped by the resin when you “wet-out” the mat. The resinshould be applied with amohair roller or brush until no white fibers remain. Any air bubbles are then eliminated with a grooved plastic or metal laminating roller. The polyester resin used should be “lay-up resin,” which is wax-free. Be careful not to over-catalyze when laying up the glass. Above 75°F one 10-15 cc of hardener to the quart will generally suffice. Below 70°F, 20 cc per quart. Do not work below 65°F.
In laying up a fiberglass mold, warping can be avoided by allowing each layer to “kick” or gel before proceeding with the next layer. For a large mold, it is good to apply just one layer per day. After the “skin coat,” you can use 1½ oz. fiberglass mat for a faster build-up. Generally, woven roving is not used in molds because the pattern transfers through the mold to the gelcoat. If it is necessary to use woven roving fiberglass for strength in a large mold, it is applied after a thickness of 3 or 4 layers of mat has cured hard. The thickness required in a mold depends upon size and shape and the number of parts to be taken off. For a dinghy mold to be used only a few times, four layers of mat might be adequate.
Removing mold from the plug
Allow mold to cure several days if possible so it will hold its shape. The first step is to trim the excess laminate back to the molded edge. This is easily done with a saber saw and a metal-cutting blade. The edges are sanded carefully until the line between the mold and plug is exposed. Then a sharpened “tongue stick” is forced between mold and plug to separate the edges. The stick is then pulled clear around the plug until all edges are free and no bridges remain. Avoid using metal tools for this purpose as they will scratch the mold surface. Then the mold should pull free of the plug. If not, the parts can be flexed or pounded gently with a rubber mallet. If necessary, air or water can be forced under pressure between plug and mold. A hole can be drilled through the interface for this purpose. PVA is water soluble, which facilitates parting with water pressure.
Polishing the mold
Depending upon the condition of the mold surface, it may have to be sanded with 220 grit working up to 600 grit wet or dry. The surface is then compounded with regular and fine finish compound formulated for fiberglass work. Best results can be achieved by using special compounds such as 3M Finesse-It Marine Paste Compound to bring out a mirror finish.
Before using a mold, it should be allowed to cure a week or more if possible. Be sure to use PVA parting film and soft wax for the first 3 or 4 parts, after which a carnauba wax can be used.
Gelcoat problems
Alligatoring, or wrinkling, can result from:
1. Gelcoat too thin in some spots
2. Insufficient hardener, or hardener not mixed will enough.
3. Gelcoat not cured long enough before mat lay-up.
4. Acetone cleaner drips out of roller or brush during mat lay-up.
Original technical article provided by Fiberglass Coatings.
As you haul your boat out of storage you may want to get the gelcoat shining once again. Use the steps below as needed:
New Boats
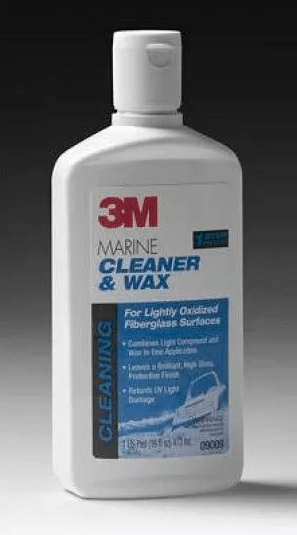
Which Products To Use: If your boat is new and the finish is still in good condition with little to no oxidation, you can use a one-step clean-and-wax product that combines washing and waxing in one step. We recommend using the 3M Marine Cleaner and Wax.
If your boat has light gelcoat oxidation use the least aggressive method, if possible, to prolong the life of gelcoat. We recommend cleaning with marine boat soap and buffing with the 3M Imperial Compound. Avoid direct sunlight and room temperature is best for application.
Note: An easy way to determine if gelcoat is oxidized is by wiping your hand across the surface. If any chalk wipes off on your hand, the gelcoat is oxidized and you will need to wash and buff the surface before polishing.
Follow these three simple steps to polish your gelcoat:
Step 1: Once you know which polish to use we recommend using a high-quality microfiber towel to apply the product. Avoid low-quality towels because they will shed fibers and leave streaks and residue on the boat.
Step 2: Wet the microfiber rag, remove any excess and apply a tablespoon of polish to the rag. This amount of polish will work for a few square feet. Remember, you want to work in small areas in order to cover the entire surface correctly.
Before buffing, spread the polish evenly across the boat’s gelcoat. You will get the best results when working the polish into the surface with circular motions.
Step 3: Once the polish dries into a haze you can remove it with a clean dry rag. Make sure you get in all the nooks and cracks for a smooth beautiful finish.
Older Boats
If your boat has been in contact with the elements over long periods of time (10-15 years), the process of restoring the appearance of the gelcoat will take some additional steps.
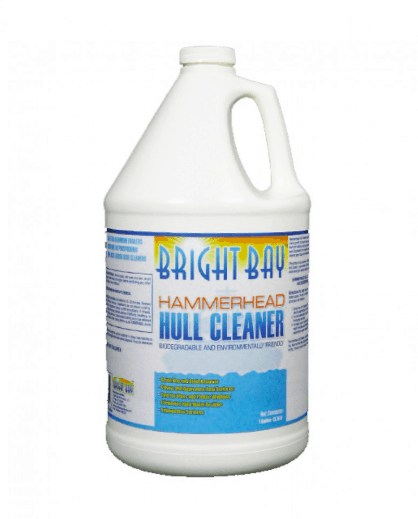
Step 1: Clean the surface. For boats that need a more aggressive cleaning just wash the surface and remove any loose contaminants. You can use a non-abrasive light detergent (marine boat soap) to remove all surface dirt and all previously applied coatings. If you need something stronger to remove surface rust, oil, tar, algae discoloration, black streaks caused from water runoff, exhaust and waterline scum, or other stains we recommend using an acid-based stain remover like Hammerhead Hull Cleaner. It is important to completely remove all stains before waxing, or you’ll seal in the stain.
Step 2: Select your compound. If your boat is a bit more oxidized a rubbing compound (liquid abrasive which “sands” your hull) is needed, but do so carefully as you can run through the gelcoat. The more faded your hull the more compounding you’ll need. The 3M Imperial Compound usually applied with a polisher if possible and compatible 3M pads, like the white 100% wool pad, recommended by 3M. Keep product off bottom paint, if applicable, by taping off as it can spatter. If the compound isn’t strong enough for your level of oxidation and scratches, then you may need to “pretreat” with a 1200 (or 800) grit as needed prior to the compound.
Note: When buffing, you should work on small sections of the hull (3-5ft sections is recommended). It is important to keep the wool pad damp. If you notice the pad is dry and the wool looks ‘matted’ after working the material into one area, just rake the wool back into form with a pad spur and re-wet the pad to continue with the application.
Step 3: Polish the surface. We offer the 3M Finesse-It II or Aqua buff 1000, to help provide a nice finish to the gelcoat after compounding and bring it to a gloss. Apply with the yellow pad by 3M.
Gelcoat is a type of resin that is applied to the hull of a boat in order to give it a smooth, glossy finish. In addition to its aesthetic appeal, gelcoat also helps to protect the hull from UV damage and tough weather conditions. While gelcoat is typically clear, it can also be tinted to a color to give the boat a unique look.
Topcoat is applied above the waterline only and is typically a polyester based high gloss polyurethane that provides long lasting gloss and color retention. Topcoat is available in both clear and colored varieties, and it can also be glossy or matte finish.

