

For many “do-it-yourselfers,” applying gelcoat can be quite intimidating. It is not as simple as painting and can be somewhat difficult to work with. One of the most frustrating problems to deal with is a new application of gelcoat that refuses to harden and cure. When one of our customers has a problem with gelcoat not curing properly, it usually stems from one of the reasons below.
What Caused it?
Incorrect Surface Preparation – Gelcoat will only adhere to fiberglass, previously cured gelcoat, or polyester resin. Do not apply gelcoat to any paint or protective coating because it will not adhere. Existing paint will have to be removed.
In order to prepare the surface correctly, it must be sanded. The heavier fast-cut grits (40/80/100) are used to feather sand and ground out a routed area prior to filling. Also, they are used for the first sanding of gouges, scratches, and blisters. When sanding areas that have been filled with putty we suggest using 40 or 80 grit sandpaper, depending on how large the repair is. You should also feather the surrounding area of the gelcoat repair with 220/330. When sanding flat areas use a rubber block. Use 3M Abrasives for best results.
Next, clean the surface with Acetone. All surfaces must be clean, dry, and free from grease, wax, oil, and other foreign matter. At this point, the repair is ready to spray or brush with gelcoat.
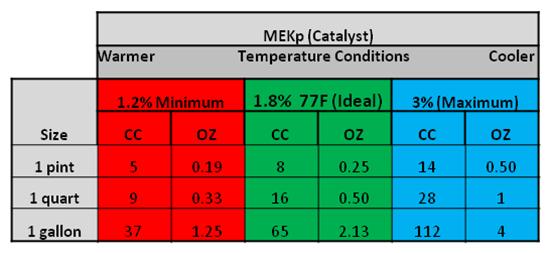
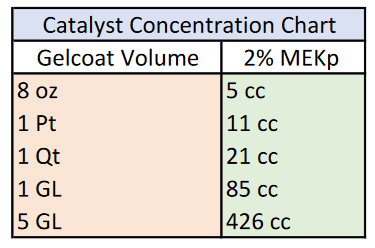
Not enough catalyst – Most gelcoat manufacturers list the amount of catalyst (MEKp) it requires on the side of the can. If you are unable to find a chart, you can use the two charts listed below. We recommend 1.5% – 2.0 % by volume. The Ideal range is 1.8% @ 77°F (approximately 12 drops per ounce of gelcoat.) If the gelcoat does not get enough catalyst it will not “kick” or begin to harden. Measurements need to be exact so you can be confident the gelcoat is mixed properly before applying it to the surface. If the measurement is off even slightly, the gelcoat could start to harden but not cure completely, leaving a tacky, non-sandable surface.
Too much catalyst – It is also possible to add too much catalyst (over catalyzing) to the mixture. This will cause the gelcoat to start curing in the can or while you are applying the gelcoat. It could happen when mixing larger batches of gelcoat since this is a chemical reaction that gets hot and cures quickly. Always mix in small batches. You should catalyze your material so that it cures as quickly as possible within your working time. Generally, mix one-pint batches. Under catalyzation slows down the curing process and causes fading and chalking in the final product. Double-check that the amount of catalyst you plan to add is correct for the amount of gelcoat you have set aside. Remember that gelcoat will react differently depending on the ambient air temperature. For warmer weather use less MEKp and for cooler weather use more MEKp to get the correct mixture. (See charts below.) It is always a good idea to keep your gelcoat at room temperature, especially prior to application. A good practice is to pour the mixed gel coat from the mixing container into another container used for application. This further assures that no uncatalyzed material is clinging to the sides of the pot.
Tips
1 mL = 1 cc If using wood mixing stick, place stick in resin before adding catalyst so the wood doesn’t absorb catalyst. Only catalyze slightly more than needed. Resin that cures still in the mixing pot is unusable.
Did not use a surfacing agent – In order to cure properly, most gelcoat require the use of a surfacing agent on the final coat. The most common type of surfacing agent is Wax Additive Sanding Aid. This wax additive seals off the surface from oxygen in the air, allowing the gelcoat to dry tack-free. The recommended ratio is 1 oz wax to 1 quart of gelcoat. The first coat of gelcoat does not need the wax since you will apply a second coat. When mixing gelcoat for the second coat, though, don’t forget to add in the wax additive. All Gelcoats from the Bottom Paint Store comes with the MEKP catalyst and wax additive sanding aid, but additional amounts can be purchased. If you don’t add a wax additive to the final coat (or only coat) of gelcoat it will not harden. This is true even if you added the correct amount of catalyst.
Not enough mils – For best results, apply the gelcoat to a wet film thickness of 25 mils. This will result in a cured film thickness of 18-22 mils. As gelcoat cures, it gives off heat in an exothermic chemical reaction. If the gelcoat is applied to thin, it will not reach the temperature needed and will not cure fully. A mil is equal to 0.001″ or one-thousandth of an inch. You can use a Wet film thickness gauge to find the thickness of your wet gelcoat. Press the edge of the gauge into the gelcoat until it touches the surface below. Look at the teeth on the gauge. The gelcoat’s current thickness is measured by noting the highest tooth with film on it and the next highest tooth with no film on it. For example, a mil gauge is labeled 10, 15, 20, 25, 30, and 35 mils. The only teeth with gelcoat on them are 10 and 15. So the gelcoat’s thickness is between 15 and 20 mils.
What’s Next?
Can I apply more gelcoat over uncured gelcoat? No. Applying more gelcoat will not help the first layer cure. Most likely it will need to be removed and reapplied.
What can I try to get the gelcoat to cure? Allow more time. If something wasn’t exactly right, the gelcoat may just take a few days to harden. If it’s not rock-solid in a few days, though, you may have to scrape it off and reapply it.
How can I remove the uncured gelcoat? Acetone on a rag can be used to break down the gelcoat. Use a plastic putty knife to scrape the uncured gelcoat away.
Read More:
Click this link to read How to Apply Gelcoat
Click this link to read Clear Coat My Bass Boat