Author Archives: Dustin Wilber

How to Apply Gelcoat by Brush and Roller

Professional Grade Exterior Gelcoat can be applied either by Spraying, Brushing or Rolling. This article will discuss how to apply the gelcoat with the brush and roller method. For a more comprehensive guide on How to Apply Gelcoat, please read this article. We will assume you have already read the article to learn about prepping the surface, sanding, and finishing the gelcoat.

Catalyzing Gelcoat with MEKP

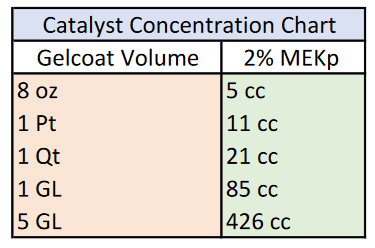
All gelcoats MUST be catalyzed with MEKP to cure. This should be added after all other additives just prior to application. We suggest 1-1/4% to 1-1/2% by volume, i.e. 13-15 cc per quart. We do NOT recommend mixing more than 1 quart at a time. Darker colors need a little more catalyst for the same reaction, so you can catalyze those up to 2%. All Gelcoats purchased from the Bottom Paint Store come with MEKP. Refer to the catalyst chart located on the product page, the product label, or the one below.

One gallon of polyester resin weighs approximately 9.2 lbs. One gallon of gelcoat weighs approximately 10.5 lbs.
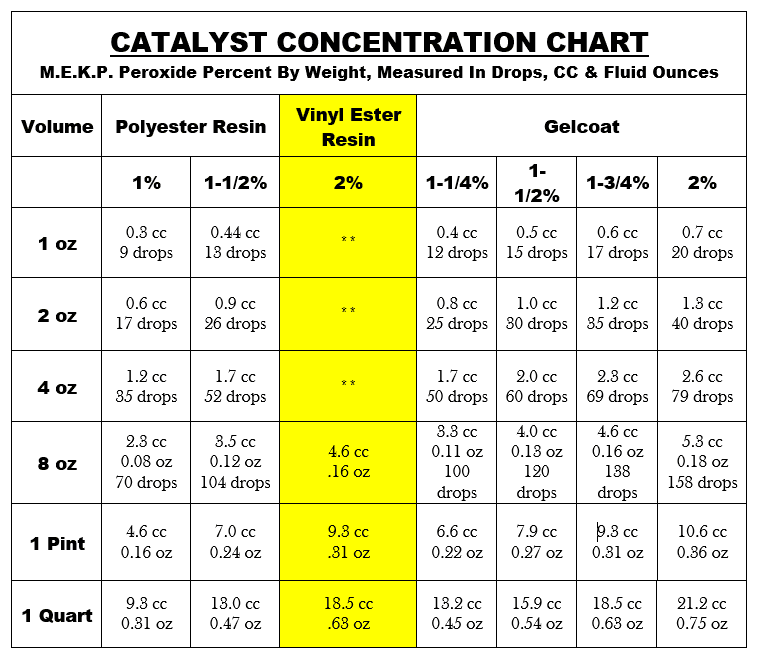
The weight of MEKP 925 is 1.125 grams per cc. 30 drops is approximately equal to one cc.

cc = cubic centimeter. Oz = fluid ounce
Note: Using drops for catalyst measurement is only an estimate. In critical applications MEKP should be measured  using cc’s or fluid oz’s which are volume measurements.
The percentages in the chart: 1% thru 2%, are percentages of resin or gelcoat by weight. The cc and oz values in the chart have been converted from weights of MEKP to volumes of MEKP.

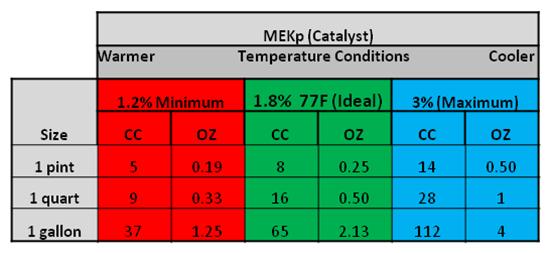
NOTE:  The catalyst level (MEKP) should not exceed 3.0% or fall below 1.2 for proper cure. Ideal range is 1.8% @ 77°F. Gel time at 1.8% MEKP is 10-17 minutes. This time element is dependent on material temperature, room temperature, humidity, air movement, and catalyst concentration. Gelcoat should not be used when temperature conditions are below 60°F, as curing may be adversely affected.

Be sure to have a good strategy when applying your gelcoat. Once you mix and catalyze, you have about 15 minutes to apply the gelcoat before it starts getting hard or starts to “gel.” The actual working time depends on the amount of catalyst and how hot the working conditions are. Anything below 60 degrees, and your gelcoat will not cure, but as you get warmer and warmer, your working time will decrease rapidly. At 70 degrees, you get 15 minutes, but at 90 degrees, you only get 5 minutes.

TIP: If you need more time to work, sit the can in some cold ice water to cool it down to 60 degrees to allow a little more working time.

Application

Brushing: Use a solvent resistant brush. The chemicals in the gelcoat can be harsh on materials not designed to withstand them. Using a solvent resistant brush should stop any brush materials from getting in the finished product.

TIP: Choose a natural bristle brush with tapered bristles that are not too stiff.

Apply gelcoat quickly using long brush strokes to help achieve an even thickness and to help remove trapped air pockets.  Load the brush fully with gelcoat each time. Applying the gelcoat quickly will help you apply it to the correct thickness. Gelcoat applied too thin will not cure properly. Remember, this gelcoat has been catalyzed and the clock is ticking. Also, large amounts of gelcoat left in the container allows a buildup of exotherm and causes the gelcoat to cure too quickly.  Once all the gelcoat is out of container and on the surface then you can spend time tidying up with the brush strokes.

TIP: Try to finish vertical areas with an upward brush stroke. This will help reduce sag.

Rolling: Use a solvent resistant 1/8 or 1/4 inch nap roller. Be sure not to use foam rollers; they tend to leave bubbles. Wrap the roller in painters’ tape and rip the tape off to remove loose fibers from the roller. Apply the gelcoat to the surface quickly. Remember, this gelcoat has been catalyzed and the clock is ticking. After wetting out a small area with the roller, use the tip of a brush to smooth out the stipple left by the roller. Move the brush in smooth strokes perpendicular to the direction that the roller moved. Be careful to not apply too much pressure during this step. Ask a friend to assist with the tipping to speed things along. When rolling or brushing on the second coat be sure to apply in the opposite direction from the previous coat. This allows for a uniform finish.

Overview

The 1st coat will consist of gelcoat and hardener only. Wait a half hour for the gelcoat to set. It should be tacky. It will not be fully cured yet.

The 2nd coat will consist of gelcoat, hardener, and wax additive sanding aid. 1 oz of sanding aid per quart or 4 oz per gallon. Sanding aid seals the surface from oxygen, causing the surface to dry tack free.

A wax additive is NOT used with HI UV Clear. You should only use a wax additive in the final application coat or if you are planning on applying only one coat.

If you followed all the steps correctly you should have a beautiful application of gelcoat! If you’re using our Professional Grade Exterior Gelcoat, you’ll be ready to sand and buff your freshly gelcoated surface after about 1- 3 hours.

ablative bottom paint

How to Apply Water-based Antifouling to Wooden Boats

Antifouling paint can be applied to many different substrates including wooden boats. What is the recommended procedure for preparing the surface? Is a primer needed? What paint should I use? This article should answer all those questions. The Bottom Paint Store has 3 water-based antifouling products: Aquagard, Sea Hawk Monterey, and Interlux Fiberglass Bottomkote Aqua.

Aquagard Water-based Antifouling Bottom Paint

When applying antifouling paint to wooden boats, primer is optional. Antifouling paint can seep into the wood grain and create a strong bond. Usually, the first coat is thinned 10% to assist in penetrating the wood grain. Then the subsequent coats can be applied normally.

If adhesion is a major concern, then primer will promote adhesion. There are 2 Aquagard primers to choose from: 181 Solvent based primer and 190 Water based primer. They both accomplish the same task, but the water-based version has less VOC’s (volatile organic compounds). If you choose to use a solvent based primer and then a water based paint, make sure the primer is completely cured before proceeding. You can read the full application instructions on the Aquagard product page.

 Monterey Self Polishing Solvent Free Bottom Paint

When applying Sea Hawk Monterey to a wood hull, no primer is needed. You can use the same method of thinning the product to allow it to seep into the wood grain. If the wood can accept more paint after the first coat, you can repeat the process a second time. Here is the step by step process for Monterey:

Step 1 – CLEAN SURFACE

Surface must be clean, dry and free of contaminants.

Step 2 – SAND & CLEAN

Sand to a uniformly frosty, dull looking surface with 80-100 grit (no finer) sandpaper; remove any residue.

Step 3 – APPLY ANTIFOULANT

Apply two coats of Sea Hawk antifouling by brush, roller or spray. Apply first coat thinned 10% and let dry overnight. Apply two more coats of bottom paint allowing 3 to 6 hours between coats and a minimum overnight dry.

Interlux Fiberglass Bottomkote Aqua

BARE WOOD: It is essential to remove all contaminants from the surface prior to sanding and overcoating.

Sand with 80 grit paper.

Clean with Special Thinner 216. Repair any defects with Watertite Epoxy Filler.

Lightly sand and wipe clean. Surface must be free from all contamination.

Fill seams, if necessary, with Seam Compound Brown 30.

Apply first coat of Fiberglass Bottomkote® Aqua thinned with clean water (do not add more than 10% by volume).

Gelcoat Did Not Cure – What Caused It and What’s Next?

For many “do-it-yourselfers,” applying gelcoat can be quite intimidating. It is not as simple as painting and can be somewhat difficult to work with. One of the most frustrating problems to deal with is a new application of gelcoat that refuses to harden and cure. When one of our customers has a problem with gelcoat not curing properly, it usually stems from one of the reasons below.

What Caused it?

Incorrect Surface PreparationGelcoat will only adhere to fiberglass, previously cured gelcoat, or polyester resin. Do not apply gelcoat to any paint or protective coating because it will not adhere. Existing paint will have to be removed.

In order to prepare the surface correctly, it must be sanded. The heavier fast-cut grits (40/80/100) are used to feather sand and ground out a routed area prior to filling. Also, they are used for the first sanding of gouges, scratches, and blisters. When sanding areas that have been filled with putty we suggest using 40 or 80 grit sandpaper, depending on how large the repair is. You should also feather the surrounding area of the gelcoat repair with 220/330. When sanding flat areas use a rubber block. Use 3M Abrasives for best results.

Next, clean the surface with Acetone. All surfaces must be clean, dry, and free from grease, wax, oil, and other foreign matter. At this point, the repair is ready to spray or brush with gelcoat.

Not enough catalyst – Most gelcoat manufacturers list the amount of catalyst (MEKp) it requires on the side of the can. If you are unable to find a chart, you can use the two charts listed below. We recommend 1.5% – 2.0 % by volume. The Ideal range is 1.8% @ 77°F (approximately 12 drops per ounce of gelcoat.) If the gelcoat does not get enough catalyst it will not “kick” or begin to harden. Measurements need to be exact so you can be confident the gelcoat is mixed properly before applying it to the surface. If the measurement is off even slightly, the gelcoat could start to harden but not cure completely, leaving a tacky, non-sandable surface.

Too much catalyst – It is also possible to add too much catalyst (over catalyzing) to the mixture. This will cause the gelcoat to start curing in the can or while you are applying the gelcoat. It could happen when mixing larger batches of gelcoat since this is a chemical reaction that gets hot and cures quickly. Always mix in small batches. You should catalyze your material so that it cures as quickly as possible within your working time. Generally, mix one-pint batches. Under catalyzation slows down the curing process and causes fading and chalking in the final product. Double-check that the amount of catalyst you plan to add is correct for the amount of gelcoat you have set aside. Remember that gelcoat will react differently depending on the ambient air temperature. For warmer weather use less MEKp and for cooler weather use more MEKp to get the correct mixture. (See charts below.) It is always a good idea to keep your gelcoat at room temperature, especially prior to application. A good practice is to pour the mixed gel coat from the mixing container into another container used for application. This further assures that no uncatalyzed material is clinging to the sides of the pot.

Tips
1 mL = 1 cc If using wood mixing stick, place stick in resin before adding catalyst so the wood doesn’t absorb catalyst. Only catalyze slightly more than needed. Resin that cures still in the mixing pot is unusable.

MEPk Levels
Note the size and temperature variables.
For Darker Colors – use 2% MEKp


Did not use a surfacing agent – In order to cure properly, most gelcoat require the use of a surfacing agent on the final coat. The most common type of surfacing agent is Wax Additive Sanding Aid. This wax additive seals off the surface from oxygen in the air, allowing the gelcoat to dry tack-free. The recommended ratio is 1 oz wax to 1 quart of gelcoat. The first coat of gelcoat does not need the wax since you will apply a second coat. When mixing gelcoat for the second coat, though, don’t forget to add in the wax additive. All Gelcoats from the Bottom Paint Store comes with the MEKP catalyst and wax additive sanding aid, but additional amounts can be purchased. If you don’t add a wax additive to the final coat (or only coat) of gelcoat it will not harden. This is true even if you added the correct amount of catalyst.

Not enough mils – For best results, apply the gelcoat to a wet film thickness of 25 mils. This will result in a cured film thickness of 18-22 mils. As gelcoat cures, it gives off heat in an exothermic chemical reaction. If the gelcoat is applied to thin, it will not reach the temperature needed and will not cure fully. A mil is equal to 0.001″ or one-thousandth of an inch. You can use a Wet film thickness gauge to find the thickness of your wet gelcoat. Press the edge of the gauge into the gelcoat until it touches the surface below. Look at the teeth on the gauge. The gelcoat’s current thickness is measured by noting the highest tooth with film on it and the next highest tooth with no film on it. For example, a mil gauge is labeled 10, 15, 20, 25, 30, and 35 mils. The only teeth with gelcoat on them are 10 and 15. So the gelcoat’s thickness is between 15 and 20 mils.

What’s Next?

Can I apply more gelcoat over uncured gelcoat? No. Applying more gelcoat will not help the first layer cure. Most likely it will need to be removed and reapplied.

What can I try to get the gelcoat to cure? Allow more time. If something wasn’t exactly right, the gelcoat may just take a few days to harden. If it’s not rock-solid in a few days, though, you may have to scrape it off and reapply it.

How can I remove the uncured gelcoat? Acetone on a rag can be used to break down the gelcoat. Use a plastic putty knife to scrape the uncured gelcoat away.

Read More:

Click this link to read How to Apply Gelcoat

Click this link to read Clear Coat My Bass Boat

Teak Oil vs. Teak Sealer – What’s the difference?

Well-maintained teak woodwork is highly prized and teak wood owners want to do everything they can to keep it looking great. However, the market is saturated with many teak products and it can be confusing to know which will work best for you. This article can be your guide to teak oil and teak sealer.

What is teak oil?

Teak oil has been used on boats and teak wood furniture for many years. Teak oils are usually made of tung oil or linseed oil with extra additives mixed in. The oil “feeds” the wood, in a sense, and accentuates the grain and color. Thus, applying oil to the teak gives it a warm and rich look. Many people choose to oil their teak because they like the beauty that oil can bring back. However, teak oil is very high maintenance. Teak Oil does not protect the wood, but it merely recovers the rich appearance that teak wood can offer. This method requires multiple coats of oil and the beautiful finish does not last long. Sunlight and UV rays carbonize the oils, turning the wood finish dark and gray over time. Gradually, the bright and warm look that you worked so hard to attain is lost once again.

What is teak sealer?

Another method of caring for teak wood is using a teak sealer. Sealers are different from oils because they do not “feed” the wood more oils or resins. Instead, they seal in the oils and resins that the existing wood contains while at the same time preventing contaminants and moisture from harming it. Sealer does need to be reapplied nearly as often as oil. It is best to keep a nice coating of teak sealer on the wood by reapplying every year.

Which teak sealer product should I use?

JustTeak™ is a marine-grade teak cleaning system that quickly and easily rejuvenates your teak. It will clean, brighten, and (using a sealer) protect your teak decking and outdoor teak furniture.

Part 1: Teak Cleaner

Renews your valuable teak, removing stains, greying and old coatings, whilst being gentle on your teak.

Part 2: Teak Brightener

Removes light stains and greying. Brightens teak when used in combination with JustTeak™ Teak Cleaner.

Part 3: Teak Sealer

Ensures a beautiful, natural finish that protects your teak from sun, rain, and stains. You will also prolong your teak from turning grey. Teak Sealer can be easily removed with JustTeak™ Teak Cleaner and Teak Brightener when it is time to re-apply.

https://www.youtube.com/watch?v=AYsyG8SMuxY


Save 10% on our Teak Sealer Restoration Kits

PropOne Vs. PropGlide

It is widely accepted that a build up of marine life on the surface of a boat’s propeller and drive shaft negatively impacts engine efficiency and performance. Even if the prop has a thin layer of growth on it’s surface area, fuel efficiency is reduced by a significant amount. To counter this problem, engineers have turned to developing “super-slick” coatings. When the drive is engaged, and the prop begins to move, any organisms attempting to adhere to the prop simply slide right off! No chemicals are used to poison or kill the organisms in the environment.

How do PropOne* and PropGlide compare?

Which coating gives you the most bang for your buck?

PropGlide is much newer to the market than PropOne, but has been in development for over ten years. Being new to the slick coating market, PropGlide appears to be able to avoid slipping into the same ruts that their competitors have. The biggest obstacle for PropOne is the cost. Comparing the two products at price point, PropGlide is about 30% less expensive and offers 25% more product. That’s 2 strikes for PropOne right off the bat. PropOne is available in the following sizes: 1000mL, 500mL, and 250mL. On the other hand PropGlide offers a size larger than PropOne’s 1000mL and still manages a lower cost. Also PropGlide offers a size smaller than PropOne’s 250mL for sailboat owners who don’t need the larger quantities of product. (For more information on choosing the right size of PropGlide, see this Coverage Chart.)

In terms of performance, both slick coatings are equally good. They do the job and do it well. It is too early to say which product will outlast the other in the minds of consumers. But for right now, we recommend PropGlide as opposed to PropOne. The savings alone makes PropGlide worth every penny.


*PropOne was formerly known as PropGold. It is essentially the same product, just a different brand name.

**This PropOne review and PropGlide review is the sole opinion of BottomPaintStore.com

***Above PropOne prices and PropGlide Prices are based on internet web search December 2016.

Which Non-Antifouling Paint is Recommended for Wood?

sailboat-1149519_640Painting a wooden boat on your own can be a daunting task. The amount of information about the correct way to paint a boat is staggering! First-time boat owners may be at a loss when trying to make a plan for their first project. The Bottom Paint Store’s aim is to make this process as stress-free as possible so you can enjoy working on your boat and ultimately, enjoy the fruits of your labor!

If your boat stays in the water and growth is a concern you’ll want to use an antifouling paint for below the waterline and follow the manufacturers specs for application to a wood hull. See application instructions of ablative antifouling:

Step 1 – CLEAN SURFACE
Surface must be clean, dry and free of contaminants.
Step 2 – SAND & CLEAN
Sand to a uniformly frosty, dull looking surface with 80-100 grit (no finer)
sandpaper; remove any residue.
Step 3 – APPLY ANTIFOULANT
Apply two coats of Sea Hawk antifouling by brush, roller or spray.
Apply first coat thinned 20% and let dry overnight. Apply two more
coats of bottom paint allowing 3 to 6 hours between coats and a
minimum overnight dry.*

Other Paint Products for Single Day Use

Here are some other products that are not recommended for long-term submersion but can be applied to wood-hulled boats.

interlux-brightside-polyurethane-28238-500x539duralux-topside-marine-enamel-high-gloss-gallon-10799-500x539Duralux Topside Marine Enamel

Interlux Pre-Kote and Interlux Brightside

For other Helpful “How To” Articles about Topside Boat Paint, Click one of the links below.

How To Patch a Hole in a Fiberglass Boat

A fiberglass boat is a great investment. They are durable and can last for years with proper care. But like anything else, they are not indestructible and will eventually need to be repaired. One of the most common repairs is patching a hole in the hull. Fortunately, this is a relatively easy repair that can be done by anyone with basic fiberglass repair skills.

The first step is to clean the area around the hole. This will remove any dirt or debris that could prevent the patch from adhering properly. Next, cut a piece of fiberglass cloth that is slightly larger than the hole. Apply a generous amount of fiberglass resin to the cloth and then place it over the hole. Use a roller or brush to smooth out the cloth and remove any air bubbles. Allow the resin to cure for 24 hours before sanding down the area and painting over it. With a little time and effort, you can have your fiberglass boat looking like new again.

A major fiberglass repair, such as patching a hole, can be a daunting task. Watching a professional do the job can help you get on the right track and be confident in doing the repair yourself. This step-by-step video tutorial produced by Sea Hawk Paints will show exactly what needs to be done when patching a hole in your fiberglass boat.

Note: Before attempting a repair by yourself, get a professional opinion. Always wears Personal Protective Equipment when sanding or working with chemical compounds! Respirator, safety glasses and gloves are always recommended.

Here is a list of products you will need for the repair:

  1. Hawk Epoxy Resin Kit – It contains the epoxy resin, catalyst and filler for the job.
  2. F5 Light Density Filler
  3. Biaxial Fiberglass matting
  4. 50 grit, 80 grit, and 100 grit sandpaper or grinding pads

Hawk Epoxy Video Tutorial

For more information see these other How To Articles:

Filling a Hole in Fiberglass

How Do I Choose Hawk Epoxy Catalyst and Fillers?

How to Mix Hawk Epoxy Resin Properly

Fairing Hull Imperfections


How to Get Strong Hardware Adhesion with Hawk Epoxy

epoxy repair kit
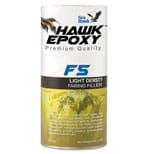
What is the best way to achieve maximum adhesion when replacing your boat’s hardware? This How To article will give you the basic knowledge you need to get your repair done correctly.

Note: Before attempting a repair by yourself, get a professional opinion. Always wears Personal Protective Equipment when sanding or working with chemical compounds!

Here are some simple steps to follow when bonding hardware to your boat:

  1. Sand both the surface and the hardware to get maximum adhesion.
  2. Wet out the surface with Hawk Epoxy.f2-filler-large-may-2014-150x150
  3. Wait a few minutes for it to soak in.
  4. Wet out the Hardware base with Hawk Epoxy.
  5. Mix another batch of Hawk Epoxy with F2 Structural Adhesive Filler.
  6. Coat the hardware base, screw threads, and surface mount with the epoxy/filler compound.
  7. Tighten hardware bolts until some epoxy mixture squeezes out.
  8. Use your finger to fillet the excess mixture around the hardware base for extra strength.
  9. Before using the hardware, allow the bond to cure overnight.

Hawk Epoxy Video Tutorial

For more information see these other How To Articles:

How Do I Choose Hawk Epoxy Catalyst and Fillers?

How to Mix Hawk Epoxy Resin Properly

Filling a Hole in Fiberglass

Fairing Hull Imperfections

Fairing Hull Imperfections

hawk-epoxy-Large-May-20141What is Fairing?

Fairing is process of smoothing out and restoring the damaged surface of the hull. A fairing compound such as Epoxy resin can be used to fill in divots or gouges and then be sanded to a smooth finish. This restores the surface to its original shape and also prepares it for painting.

Note: Before attempting a repair by yourself, get a professional opinion. Always wears Personal Protective Equipment when sanding or working with chemical compounds!

Here are some guidelines to fairing out imperfections in your hull:

  1. Sand all loose surface debris and hard edges.f5-filler-large-may-2014
  2. Rid surface of debris with clean cloth.
  3. Wet out surface with Hawk Epoxy.
  4. Mix another batch of Hawk Epoxy with F5 Light Density Filler and apply to repair area.
  5. Use long strokes to spread out filler compound over the damaged hull. Apply until the mixture is slightly raised above the hull surface. Make sure the compound extends beyond the repair area.
  6. Let cure 6 hours.
  7. Add skim coat of F5 Filler / Epoxy compound to achieve a very smooth surface. Let cure.
  8. Sand the repair to the desired shape with 80 grit sandpaper.
  9. Finish by applying another 2 or 3 layers of Hawk Epoxy Resin.
  10. The surface is ready to be painted!

Hawk Epoxy Video Tutorial

For more information see these other How To Articles:

How Do I Choose Hawk Epoxy Catalyst and Fillers?

How to Mix Hawk Epoxy Resin Properly

Filling a Hole in Fiberglass

How to Get Strong Hardware Adhesion with Hawk Epoxy


How to Mix Hawk Epoxy Resin Properly

Sea Hawk’s Epoxy Pump Kit makes it easier than ever to measure the Resin to Catalyst ratio very accurately, and get the same result every single time! But how are the pumps intended to be used?

hawk-epoxy-pump-kit-large-152x154
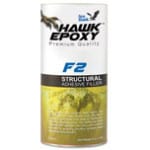
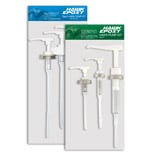
The Pump Kits come in two sizes, one kit accommodating the Size 1 and 2 Resin and Catalysts, and one kit accommodating the Size 3 Resin and Catalysts. Be sure to get the right size kit for the amount of resin and catalyst you plan on using. The Kit contains a total of 3 pumps; one for R1 Resin, one for C2 & C3 Catalyst, and one for C1 & C5 Catalyst.

The Hawk Pump Kit User Manual and instructional video explain how to use the pumps for accurate measuring, how to prime the pumps, pump cleaning and storage, and how to use the pumps with various Hawk Epoxy System Sizes.

Click here for Hawk Epoxy Size 1 and 2 User Manual

Click here for Hawk Epoxy Size 3 User Manual

Hawk Epoxy Video Tutorial

Which Bottom Paint is Best for Freshwater Lakes?

algae
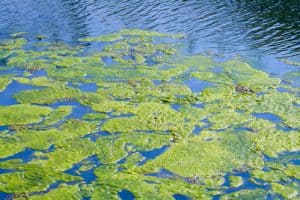
Most Antifouling Bottom Paint is marketed toward the harsh conditions of the Caribbean. But which Antifouling Bottom Paint will work best in Freshwater Lakes?

The short answer is this: Antifouling Bottom Paint that works well in the harsh conditions of the Caribbean will be more than enough protection for boats in freshwater lakes. The real trick is choosing the paint that will fit your situation the best. Choosing a bottom paint with more biocide (usually cuprous oxide) will be more potent and fight off growth more successfully. Sometimes you don’t need to purchase the strongest and the greatest. A paint with just the right amount of biocide will do nicely and can also save a few bucks.

Here are some basic guidelines to help you decide which paint is best for your boat.

boat-trailer-360If the boat comes out of the water periodically, such as on a lift or trailer, Ablative Bottom Paint is the correct choice. When in fresh water, slime and algae tend to be the most concerning. Sea Hawk’s AF-33 or Talon and Blue Water Marine’s Copper Shield 25 perform really well with these conditions, especially with the manufacturers boosters added, see below.

If the boat never comes out of the water except to be repainted, a Hard Epoxy Bottom Paint will keep away the algae. Sea Hawk Sharkskin is a mid strength Hard Bottom Paint that fits a tighter budget.

What about Bottom Paint Additives?

Sea Hawk bottom paint produces a paint additive called Bio Cop TF to help fight against algae and soft growth. This product will boost the effectiveness of your paint’s ability to keep the hull free of growth. **NOTE: Biocop TF Pint may only be used as a bottom paint additive in the following products: AF-33, Cukote, Sharkskin, Talon, and Tropikote. A booster has restrictions to paint added to and you should stick with the same manufacturer.

If you still aren’t sure what is needed for your boat, check out these other How To Articles:

Do I Need Bottom Paint on My Boat?

What is the Best Paint for My Boat?

Choosing the Right Boat Paint

How to Apply Bottom Paint Over Existing Bottom Paint

Can Aluma Hawk Paint be used with Tuff Stuff Epoxy Primer?

The direct answer is Yes.

Sea Hawk Tuff Stuff Epoxy Primeraluma-hawk-boat-paint-by-sea-hawk-paints-28288-1000x1078 is an effective water barrier and universal primer. When applied to metal hulled boats it can serve as corrosion protection below the waterline. Therefore many boaters want to have that sort of protection on their Jon boat and apply Aluma Hawk Boat Paint on top. Aluma Hawk is an aluminum boat paint that is one of the easiest and most popular paints for aluminum boats. It is a quick-dry, high-solids, corrosion-inhibiting coating designed for use on an aluminum surface without the need for additional primers. It is chromate-free and may be used above or below the waterline in fresh or saltwater environments. You can paint Aluma Hawk with a brush, roller, or spray. Apply 2 coats following the proper dry time requirements. No sanding is necessary between coats of Aluma Hawk if less than 48 hours between coats. Thinning: thin if necessary with MEK.

When over-coating Tuff Stuff Epoxy Primer it is important to meet the required over-coating times in order to achieve the best adhesion because temperature and humidity have a direct impact on dry times. QUICK and EASY RULE: When the coating is dry to the touch, yet still has some tack, it is ready to be over-coated. Your thumb will leave a print without lifting any epoxy. This is called hot-coating. However, if the coating is completely cured (or after 24 hours) it needs to be thoroughly sanded with 80 grit sandpaper to remove the shine, or you must apply another coat of Tuff Stuff within 6 days. Then you have an additional 24-hour maximum window to overcoat with paint.

Tuff Stuff Marine Epoxy Primer

These two products are great on their own, but they can do so much more when working in conjunction with each other.